LAB - Setting up Kubernetes Cluster with Kubeadm
This documents describes how to setup kubernetes from scratch on your own nodes, without using a managed service. This setup uses kubeadm to install and configure kubernetes cluster.
Compatibility
Kubernetes is an open-source system for automating deployment, scaling, and management of containerized applications.
The below steps are applicable for the below mentioned OS
| OS | Version | Codename |
|---|---|---|
| Ubuntu | 16.04 / 18.04 | Xenial |
Base Setup
Skip this step if using a pre configured lab environment
Skip this step and scroll to Initializing Master if you have setup nodes with vagrant
On all nodes which would be part of this cluster, you need to do the base setup as described in the following steps. To simplify this, you could also download and run this script
Create Kubernetes Repository
Skip this step if using a pre configured lab environment
We need to create a repository to download Kubernetes.
curl -s https://packages.cloud.google.com/apt/doc/apt-key.gpg | apt-key add -
cat <<EOF > /etc/apt/sources.list.d/kubernetes.list
deb http://apt.kubernetes.io/ kubernetes-xenial main
EOF
Installation of the packages
Skip this step if using a pre configured lab environment
We should update the machines before installing so that we can update the repository.
apt-get update -y
Installing all the packages with dependencies:
apt-get install -y docker.io kubelet kubeadm kubectl kubernetes-cni
rm -rf /var/lib/kubelet/*
Setup sysctl configs
Skip this step if using a pre configured lab environment
In order for many container networks to work, the following needs to be enabled on each node.
sysctl net.bridge.bridge-nf-call-iptables=1
The above steps has to be followed in all the nodes.
Begin from the following step if using a pre configured lab environment
Initializing Master
This tutorial assumes kube-01 as the master and used kubeadm as a tool to install and setup the cluster. This section also assumes that you are using vagrant based setup provided along with this tutorial. If not, please update the IP address of the master accordingly.
To initialize master, run this on kube-01 (1st node)
replace 192.168.56.101 with the actual IP of your node
kubeadm init --apiserver-advertise-address 192.168.56.101 --pod-network-cidr=192.168.0.0/16
Initialization of the Nodes (Previously Minions)
After master being initialized, it should display the command which could be used on all worker/nodes to join the k8s cluster.
e.g.
kubeadm join --token c04797.8db60f6b2c0dd078 192.168.12.10:6443 --discovery-token-ca-cert-hash sha256:88ebb5d5f7fdfcbbc3cde98690b1dea9d0f96de4a7e6bf69198172debca74cd0
dont copy above command as is, this is just a sample, use actual
Copy and paste it on all node.
Setup the admin client - Kubectl
on Master Node
mkdir -p $HOME/.kube
sudo cp -i /etc/kubernetes/admin.conf $HOME/.kube/config
sudo chown $(id -u):$(id -g) $HOME/.kube/config
Validate
kubectl get nodes
You could also put the above command on a watch to observe the nodes getting ready.
watch kubectl get nodes
Installing CNI with Weave
Installing overlay network is necessary for the pods to communicate with each other across the hosts. It is necessary to do this before you try to deploy any applications to your cluster.
There are various overlay networking drivers available for kubernetes. We are going to use Weave Net.
export kubever=$(kubectl version | base64 | tr -d '\n')
kubectl apply -f "https://cloud.weave.works/k8s/net?k8s-version=$kubever"
Validating the Setup
You could validate the status of this cluster, health of pods and whether all the components are up or not by using a few or all of the following commands.
To check if nodes are ready
kubectl get nodes
kubectl get cs
[ Expected output ]
root@kube-01:~# kubectl get nodes
NAME      STATUS    ROLES     AGE       VERSION
kube-01   Ready     master    9m        v1.8.2
kube-02   Ready     <none>    4m        v1.8.2
kube-03   Ready     <none>    4m        v1.8.2
Additional Status Commands
kubectl version

kubectl cluster-info

kubectl get pods -n kube-system

kubectl get events
It will take a few minutes to have the cluster up and running with all the services.
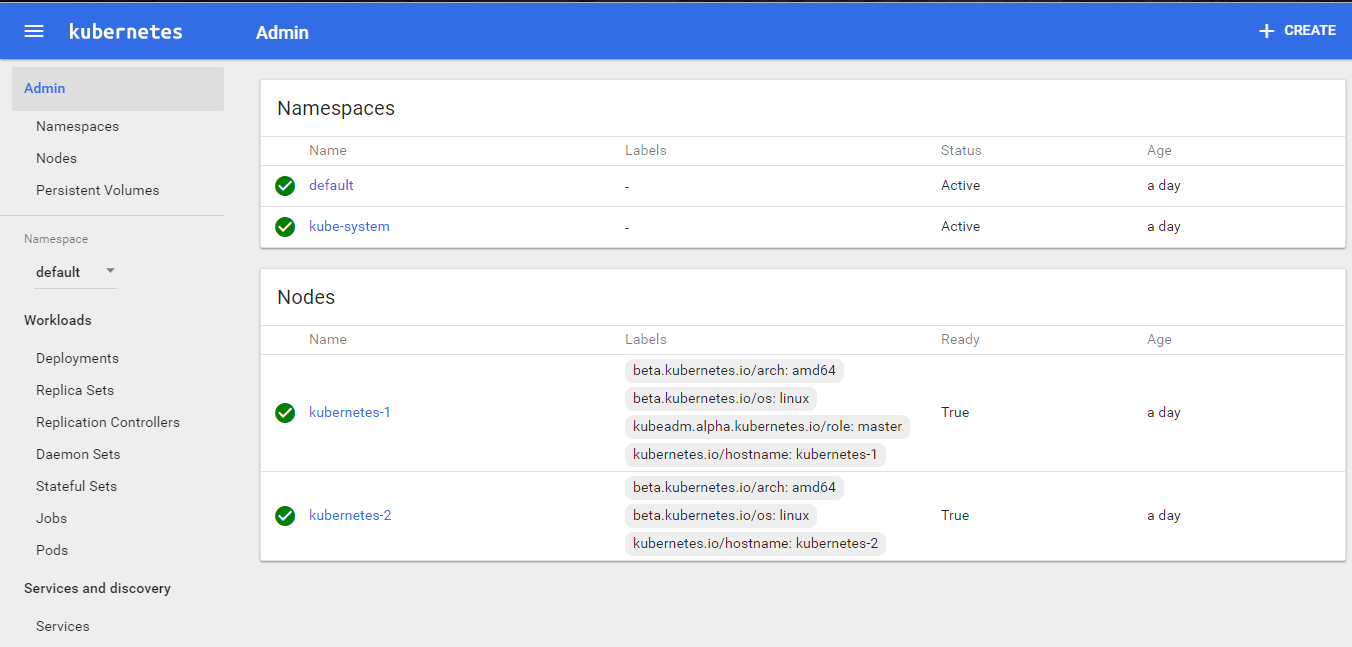
Enable Kubernetes Dashboard
After the Pod networks is installled, We can install another add-on service which is Kubernetes Dashboard.
Installing Dashboard:
kubectl apply -f https://gist.githubusercontent.com/initcron/32ff89394c881414ea7ef7f4d3a1d499/raw/4863613585d05f9360321c7141cc32b8aa305605/kube-dashboard.yaml
This will create a pod for the Kubernetes Dashboard.
Dashboard would be setup and available on port 31000. To access it go to the browser, and provide the following URL
use any of your node's (VM/Server) IP here
http://NODEIP:31000
The Dashboard Looks like:
Set up Visualiser
Fork the repository and deploy the visualizer on kubernetes
git clone  https://github.com/schoolofdevops/kube-ops-view
kubectl apply -f kube-ops-view/deploy/
Visualiser will run on 32000 port. You could access it using a URL such as below and add /#scale=2.0 or similar option where 2.0 = 200% the scale.
replace <NODE_IP> with actual IP of one of your nodes
http://<NODE_IP>:32000/#scale=2.0
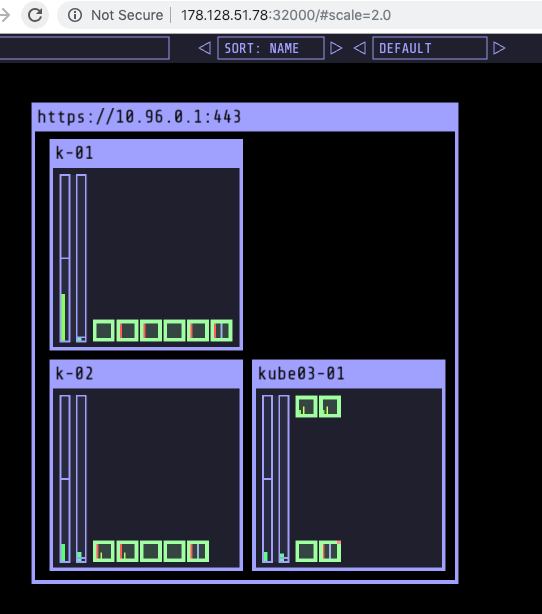
Kubernetes visualiser is a third party application which provides a operational view of your kubernetes cluster. Its very useful tool for learning kubernetes as it demonstrates the state of the cluster as well as state of the pods as you make changes. You could read further about it at this link.
Download the supporting code
Before we proceed further, please checkout the code from the following git repo. This would offer the supporting code for the exercises that follow.
run this on the host where you have configured kubectl
git clone https://github.com/initcron/k8s-code.git